Pulley Taping: Why The H-Tape Method?
By Matt DeStefano, PT, DPT
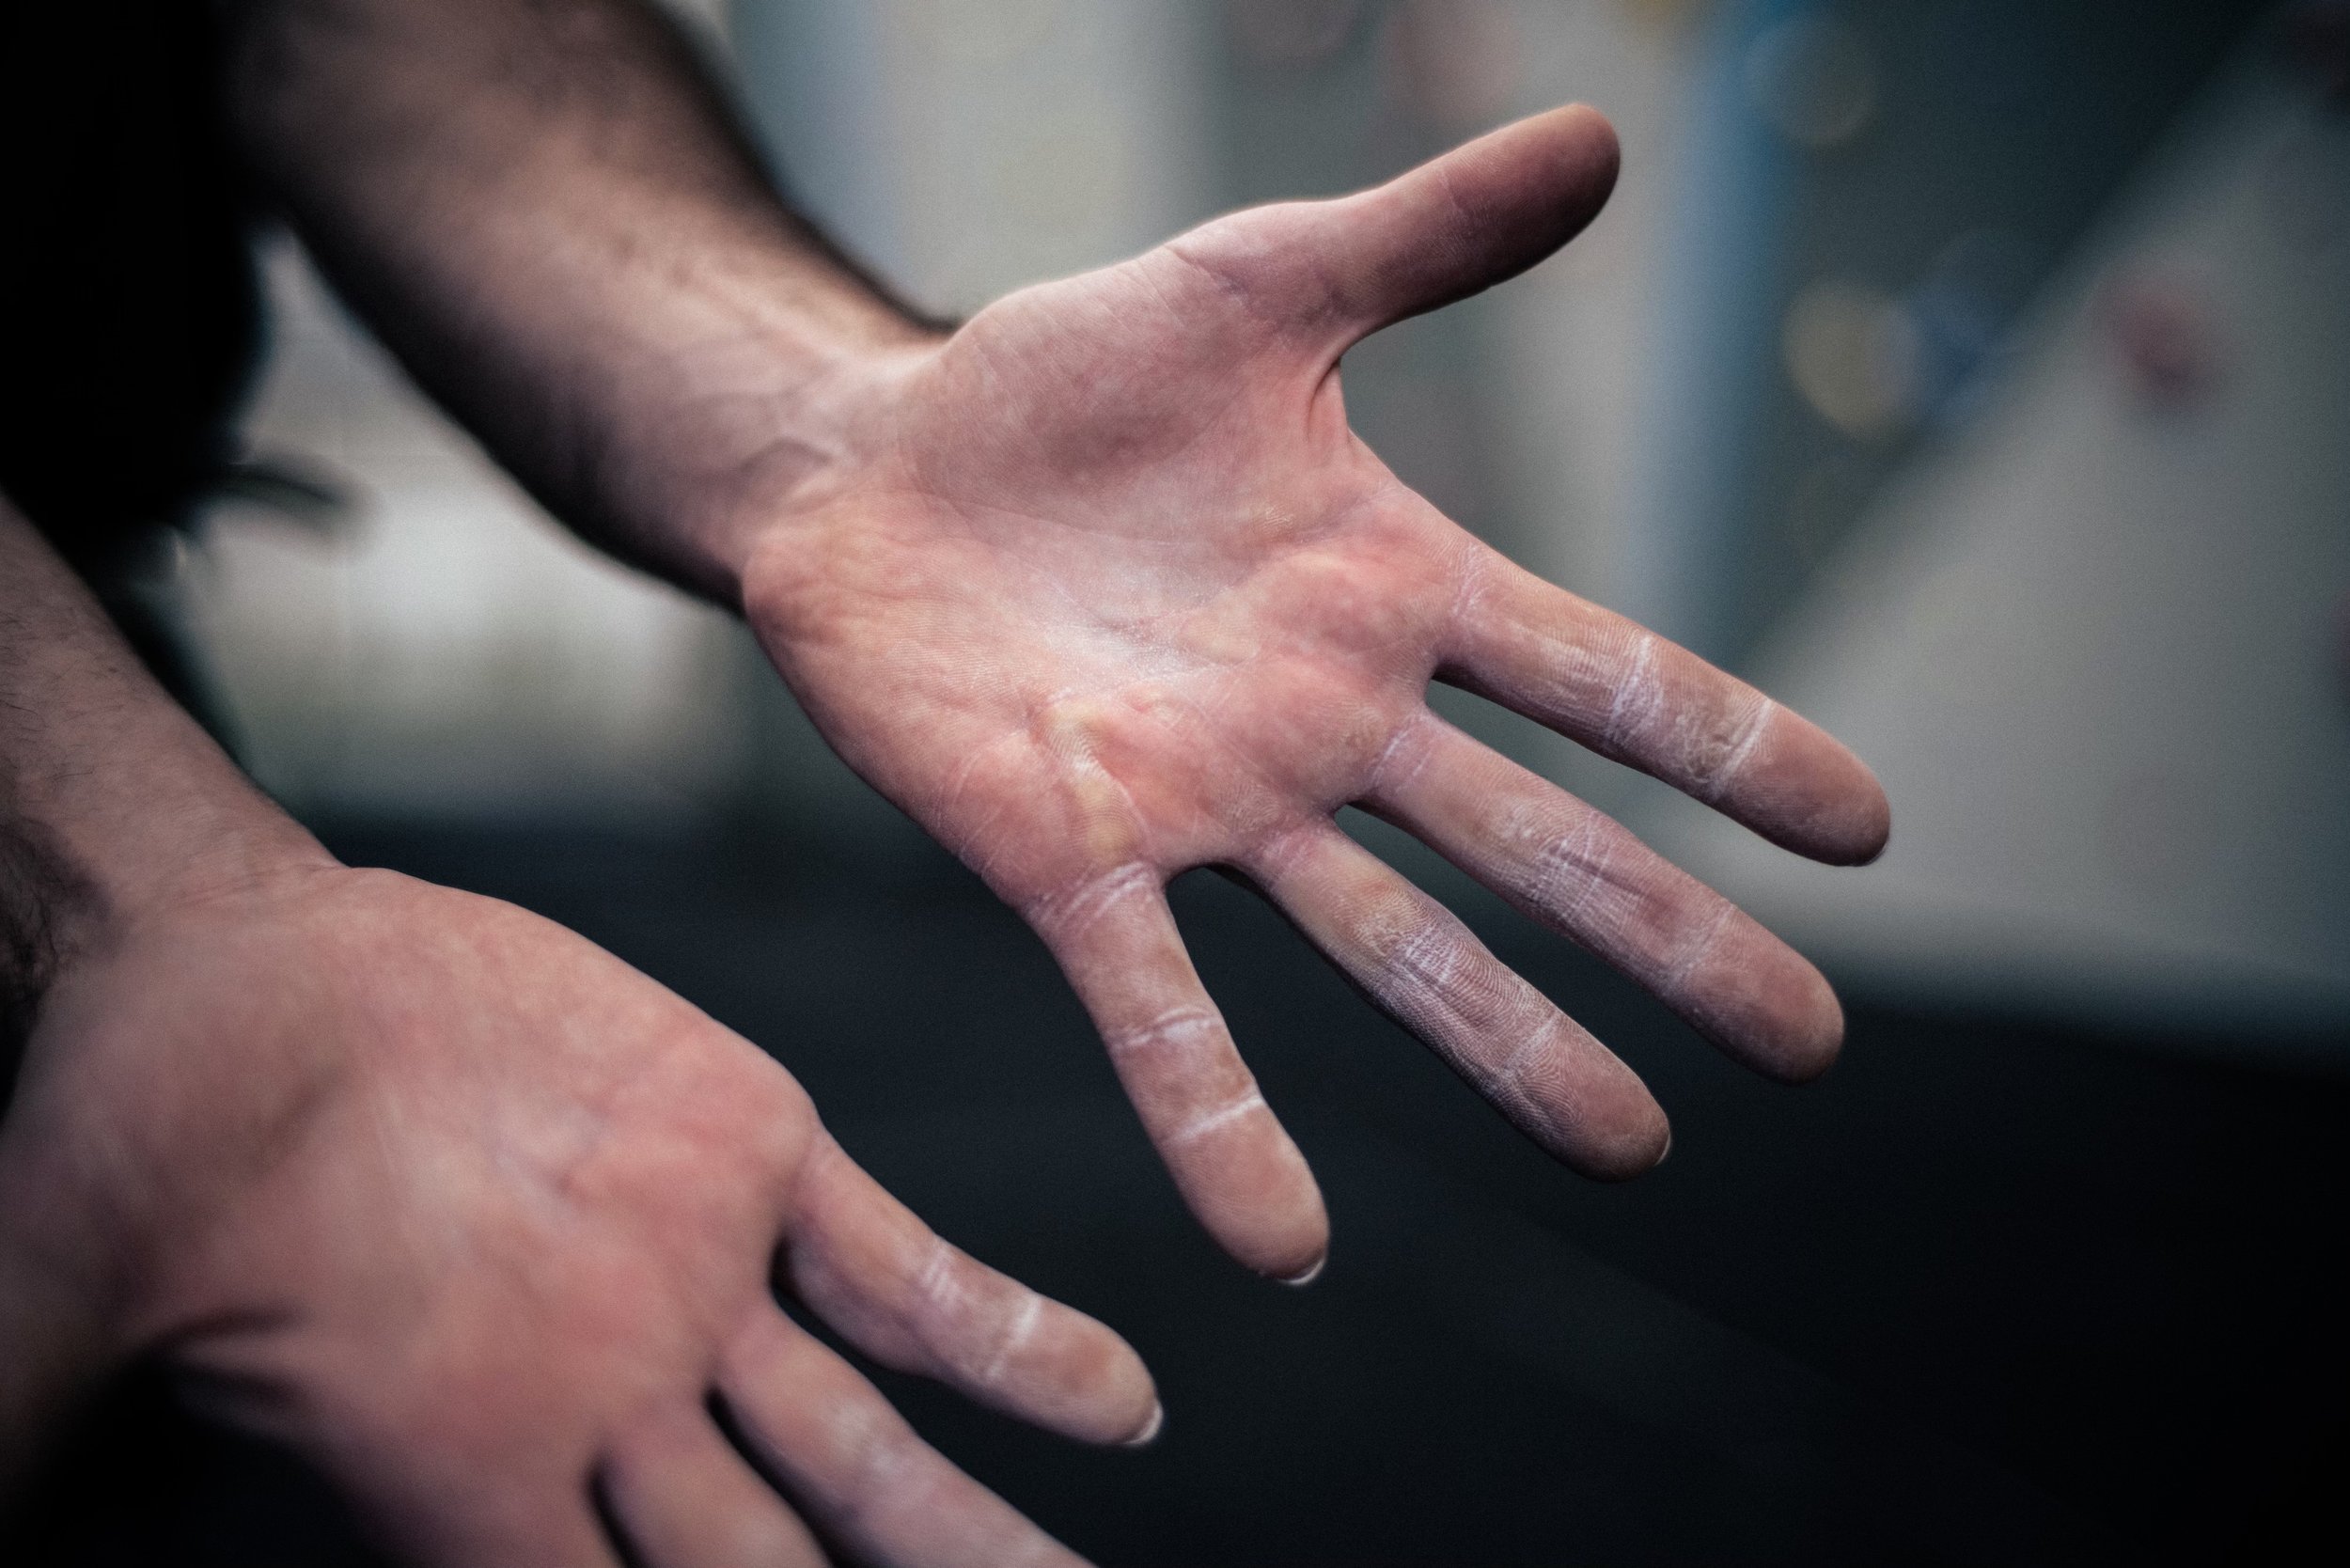
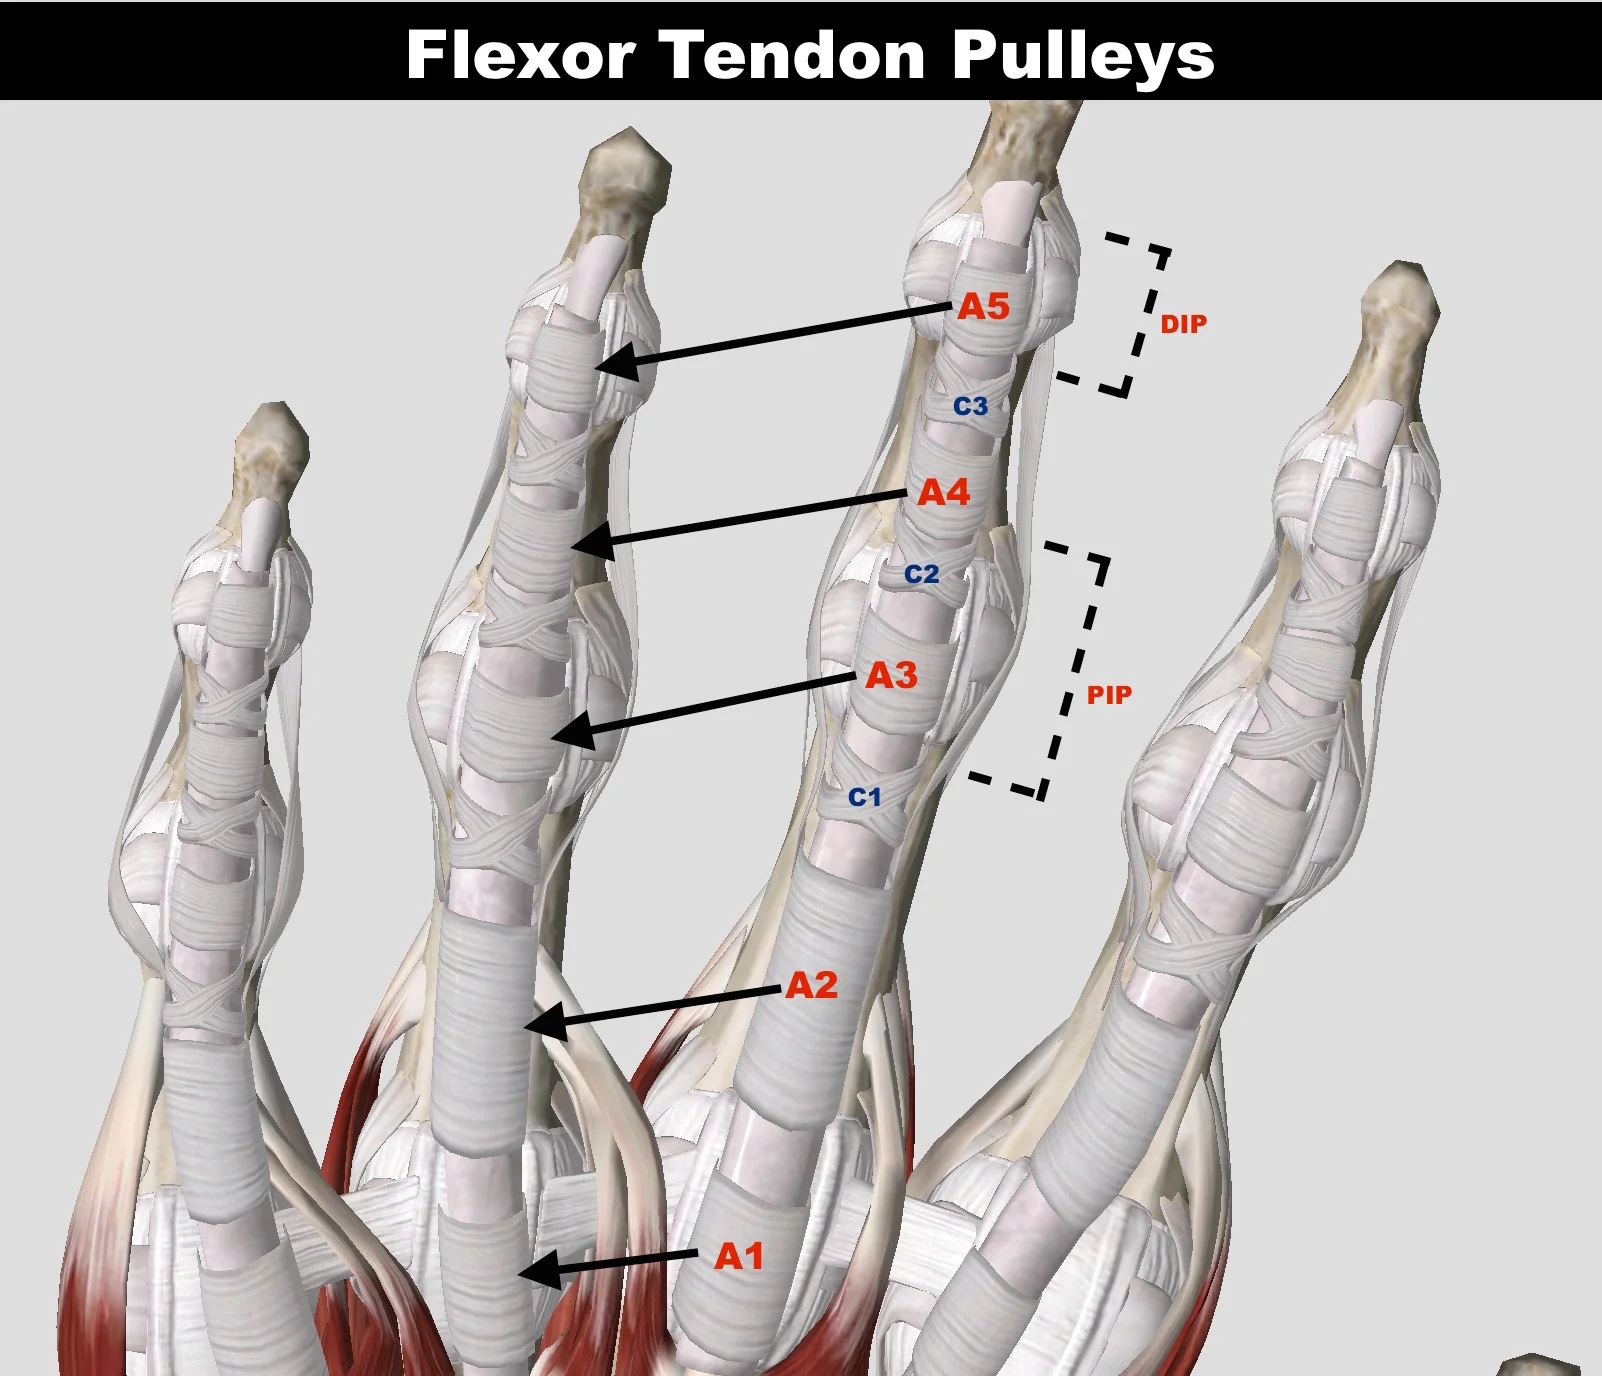
In this article, I’m going to discuss taping methods for your finger after sustaining a pulley injury. Remember from my first pulley injury article (Part 1) that finger pulleys are ligamentous structures that hold the flexor tendons of the fingers close to the bone to create a mechanical advantage for finger flexion. Finger pulleys are analogous to the eyelets on a fishing rod, without which would allow a bowstringing effect to occur when tension is placed on the fishing line (or tendon). When a pulley is strained or ruptured, bowstringing can occur which increases the tendon-bone distance, and creates excess stress on the remaining pulleys. The A2 pulley is the most commonly injured pulley and is very prone to injury when crimping due to the biomechanical forces present.1–9 During the rehab phase of a pulley injury, it is very important to offload the healing pulley, and tape can be a good option to get the job done. [Due to the biomechanics of the finger pulleys, taping is only indicated for use to offload your pulleys during a crimp grip, and has minimal necessity or effect on an open-handed grip.]
Over the years, many doctors and climbers have experimented with different types of finger taping to add structural support to an injured pulley. As you will read in this article, some methods are more effective than others. This article will educate you on the best method to use known as H-taping. As a brief note, taping of the fingers to support the pulleys will never be strong enough to replace the job of a pulley, but it can offload the tissue to avoid other complications during rehab. In addition, it must be mentioned that tape should not be used as a prophylactic measure over long periods of time. Your body’s ligaments and tendons all gain strength by applying gradual, therapeutic stresses to the tissue in order to increase collagen deposition and to help by aligning the fibers in the correct orientation. The more you climb, your body responds to the mechanical loads introduced by climbing and actually changes in morphology.10,11 In human physiology, “Davis’s Law” explains how our soft tissues grow/strengthen in response to stress. With a gradual progression to climbing intensity over many months to years, you will naturally strengthen your body’s tissues. In the case of finger pulleys the tensile strength increases. If you were to use finger taping all the time, the tape would share the load with your pulley, and your pulleys would not get that full therapeutic load. Ultimately, taping would keep them from having the best chance to naturally gain full strength. Therefore, taping to prevent pulley injuries is not recommended.
[Sidenote: your muscles grow and adapt much faster than your ligaments and tendons. Muscle can adapt on the order of weeks, whereas ligaments and tendons may take months to years to adapt. With that said, if you are a new climber and you got strong really quick, just remember that your pulleys (and other ligaments/tendons) are still playing catch-up. Your burly muscles might place too much stress on your growing pulleys, leaving you at risk of injury. Be careful and respect your body.]
Research On Pulley Taping
Schweizer Study: Circumferential Taping
BIOMECHANICAL EFFECTIVENESS OF TAPING THE A2 PULLEY IN ROCK CLIMBERS, 2000
In 2000, Dr. Andreas Schweizer conducted a study looking at the biomechanical effectiveness of circular (AKA circumferential) taping over the A2 pulley in climbers.12 Schweizer’s study consisted of using a distance measuring transducer to measure the amount of bowstringing (physiologically normal, not pathologic bowstringing) in the ring and middle finger during a crimp grip. He measured 4 participants (1 women and 2 men aged 30, and 1 man aged 58 years) ensuring to have the participants warm up their fingers and forearms prior to testing. Our fingers demonstrate normal physiologic bowstringing during warm-up of the tissues, so he wanted to control for this. Post-warm up, bowstringing becomes constant thereafter.
In the study, two locations of tape application were studied: (a) the tape was applied in a circular fashion over the distal edge of the A2 pulley, and (b) the tape was applied in a circular fashion over the distal end of the proximal phalanx.
Notice the pulley-tendon angle schematics to the left of each finger. Taping over the distal end of the proximal phalanx reduces the angle and perpendicular force on the pulley.


The results of the study showed that taping over the distal edge of A2 did not decrease bowstringing by more than 5% or absorb more than 10% of the force on the pulley. Taping over the distal end of the proximal phalanx however, decreased bowstringing by about 20%. Taping over the distal end of the proximal phalanx helped to reduce the angle of the flexor tendon acting upon the A2 pulley, and thus reduced the perpendicular force applied to the pulley. Excessive perpendicular force on the pulley can be a cause for symptoms in the pulley (a Lin et al. study13 reported an approximate 17% reduction in the perpendicular force when reducing the flexor tendon angle acting on the pulley by 3˚ using this taping method.) This all sounds great, but even taping over the distal end of the proximal phalanx did not decrease the total force of bowstringing by a large amount.
So what does all this mean? Schweizer reports that “from a biomechanical point of view, [circumferential] pulley taping is probably minimally effective in relieving load from the A2 pulley when used to treat pain in this region.” He then goes on to say that “it is even more unlikely that protective pulley taping will prevent traumatic rupture of pulleys.”12 Another study done in 2000 by Warme and Brooks14 tested the preventative effect of pulley taping on cadavers to see if tape would increase the load to failure (in other words, if tape could prevent a pulley rupture.) The results of their study showed that there were no significant increases in strength (load failure) to the A2 pulley when using tape on the cadavers.
Based on his study’s results, Schweizer’s main take-away is that if you were going to use circumferential taping, it would be more effective to tape over the distal end of the proximal phalanx. But he cautions the user that “the percentage of the force of bowstringing that the pulley taping is able to bear decreases as the external force increases. Therefore, as the performance of a rock climber improves, the less effective pulley taping becomes.”12

n short, circumferential pulley taping at the distal end of the proximal phalanx can be “minimally” effective in relieving the stress on the A2 pulley, and it’s effectiveness decreases as the external force on the fingertip is increased (AKA as you pull harder on crimps.) The Schweizer study12 and the Warme and Brooks study14 also conclude that taping of the fingers as a prophylactic measure against flexor tendon sheath injuries is not recommended (remember the cadaver study mentioned above.)
But is this the only way to tape your pulley and is it really all about pain reduction? What about the H-tape method introduced by Dr. Isabelle Schöffl in 2007? Schweizer initiated the academic investigation into pulley taping and he gave us very valuable information about the biomechanics of basic taping for our pulleys. His research sparked further investigation into other taping methods and established the importance of moving the tape application site closer to the PIP. Let’s now look at another method: H-Tape.
Schöffl Study: H-Taping
IMPACT OF TAPING AFTER FINGER FLEXOR TENDON PULLEY RUPTURES IN ROCK CLIMBERS, 2007
Dr. Isabelle Schöffl developed a new taping method, known as “H-taping”, to reduce tendon-bone distances (bowstringing) by supporting the finger pulleys in a different way. The new taping method and the tape application site were different than previous methods. H-taping was experimentally tested against the older taping variations (and a control group using no tape) to see if there were any significant differences. The study examined 8 subjects with singular A2 pulley ruptures and multiple pulley ruptures of A2 and A3 pulleys.15 The researchers used standardized ultrasound to determine the tendon-bone distance and the effectiveness of various taping methods to reduce the bowstringing. The study also evaluated the H-tape’s effect on strength of the injured finger (injuries older than 1 year), but this article will focus mostly on the biomechanical effect of the H-tape method on tendon-bone distance.
When trying to find a better method to decrease the force on the A2 pulley, Dr. Schöffl consulted the biomechanical models. The force on the A2 pulley is a consequence of the tension developed in the tendons as well as of the angle between pulley and tendon8 (angle β - see figure below.) Remember from part 1 of my pulley injury articles that the more we flex the proximal interphalangeal (PIP) joint, the bigger knuckle of the two on your finger, the more stress is placed on the A2 pulley. This is because the pulley-tendon angle described here is decreased. Increased friction between tendon and pulley is also a contributing factor to stress on the A2 pulley16, and friction on the whole tendon sheath is increased as the angle β is decreased. Because the first parameter, which is tension in the tendons, is essentially how hard we are pulling on a crimp, the more logical parameter to change was the angle between pulley and tendon. This is where the H-tape comes in.

In order to decrease the pulley-tendon angle, and thus further decrease the friction on the tendon sheath system, the logical location to place the tape is where the tendon is naturally farthest from the bone during a crimp grip. This location is directly over the A3 pulley, on the palmar side of the PIP joint. In 2004, Schöffl, V. and Hochholzer used a taping method that used a figure eight formation around the palmar side of the PIP joint.17 In the current H-tape method, Dr. Isabelle Schöffl created a taping technique much like the shape of the figure eight method from 2004, but by dividing the tape into two distinct strips with a bridge in the middle, the force can be more effectively transmitted directly over the A3 pulley.15 As you will read shortly, this H-tape method outperforms the previously mentioned figure eight.

Notice the location of the H-tape “bridge”. This allows optimal support of the A3 pulley and reduction of pulley-tendon angle.
How Is H-Tape Applied?
Everyone’s fingers are going to be different, so the following tape measurements are a guideline. For thicker fingers, use slightly wider tape, and for thinner fingers use slightly thinner tape. The instructions for application however, are the same. These instructions are straight from the research study, and later in the article I will break down the steps with images. Dr. Schöffl describes the method as follows: A tape of a length of 10 cm and a width of 1.5 cm is cut in half longitudinally from both ends, leaving a bridge of 1 cm standing in the middle. After adjusting the proximal straps at the distal end of the proximal phalanx, the PIP joint is flexed and the remaining two distal straps are wrapped tightly around the proximal part of the middle phalanx.15 The PIP flexion is a very important step in applying the tape because you want to mimic a crimp grip, and due to the movement of the palmar plate during finger flexion, the tape is held in a more stable position. [Author’s note: In both the research paper, and Dr. Volker Schöffl’s book, One Move Too Many,17 it is described to attach the tape to the proximal phalanx first. But in a video I share below, Dr. Volker Schöffl himself is seen applying the tape first to the middle phalanx, and then to the proximal phalanx. Based upon my professional opinion, and from the fact that the authors show both variations, I don’t think it matters which phalanx you apply the tape to first. Just ensure that you flex the PIP when securing the second set of tape arms to your finger. This flexion mimics the flexion in a crimp grip, keeps the tape “bridge” closer in proximity to the A3 pulley, and keeps the tendon-bone distance to a minimum.]
Step-By-Step Description of H-Taping:
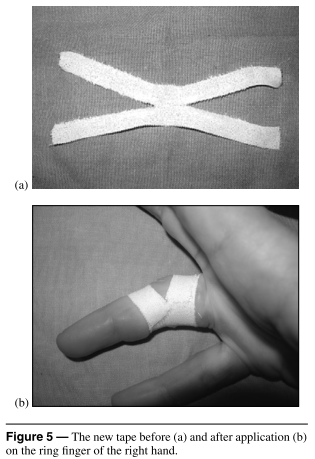
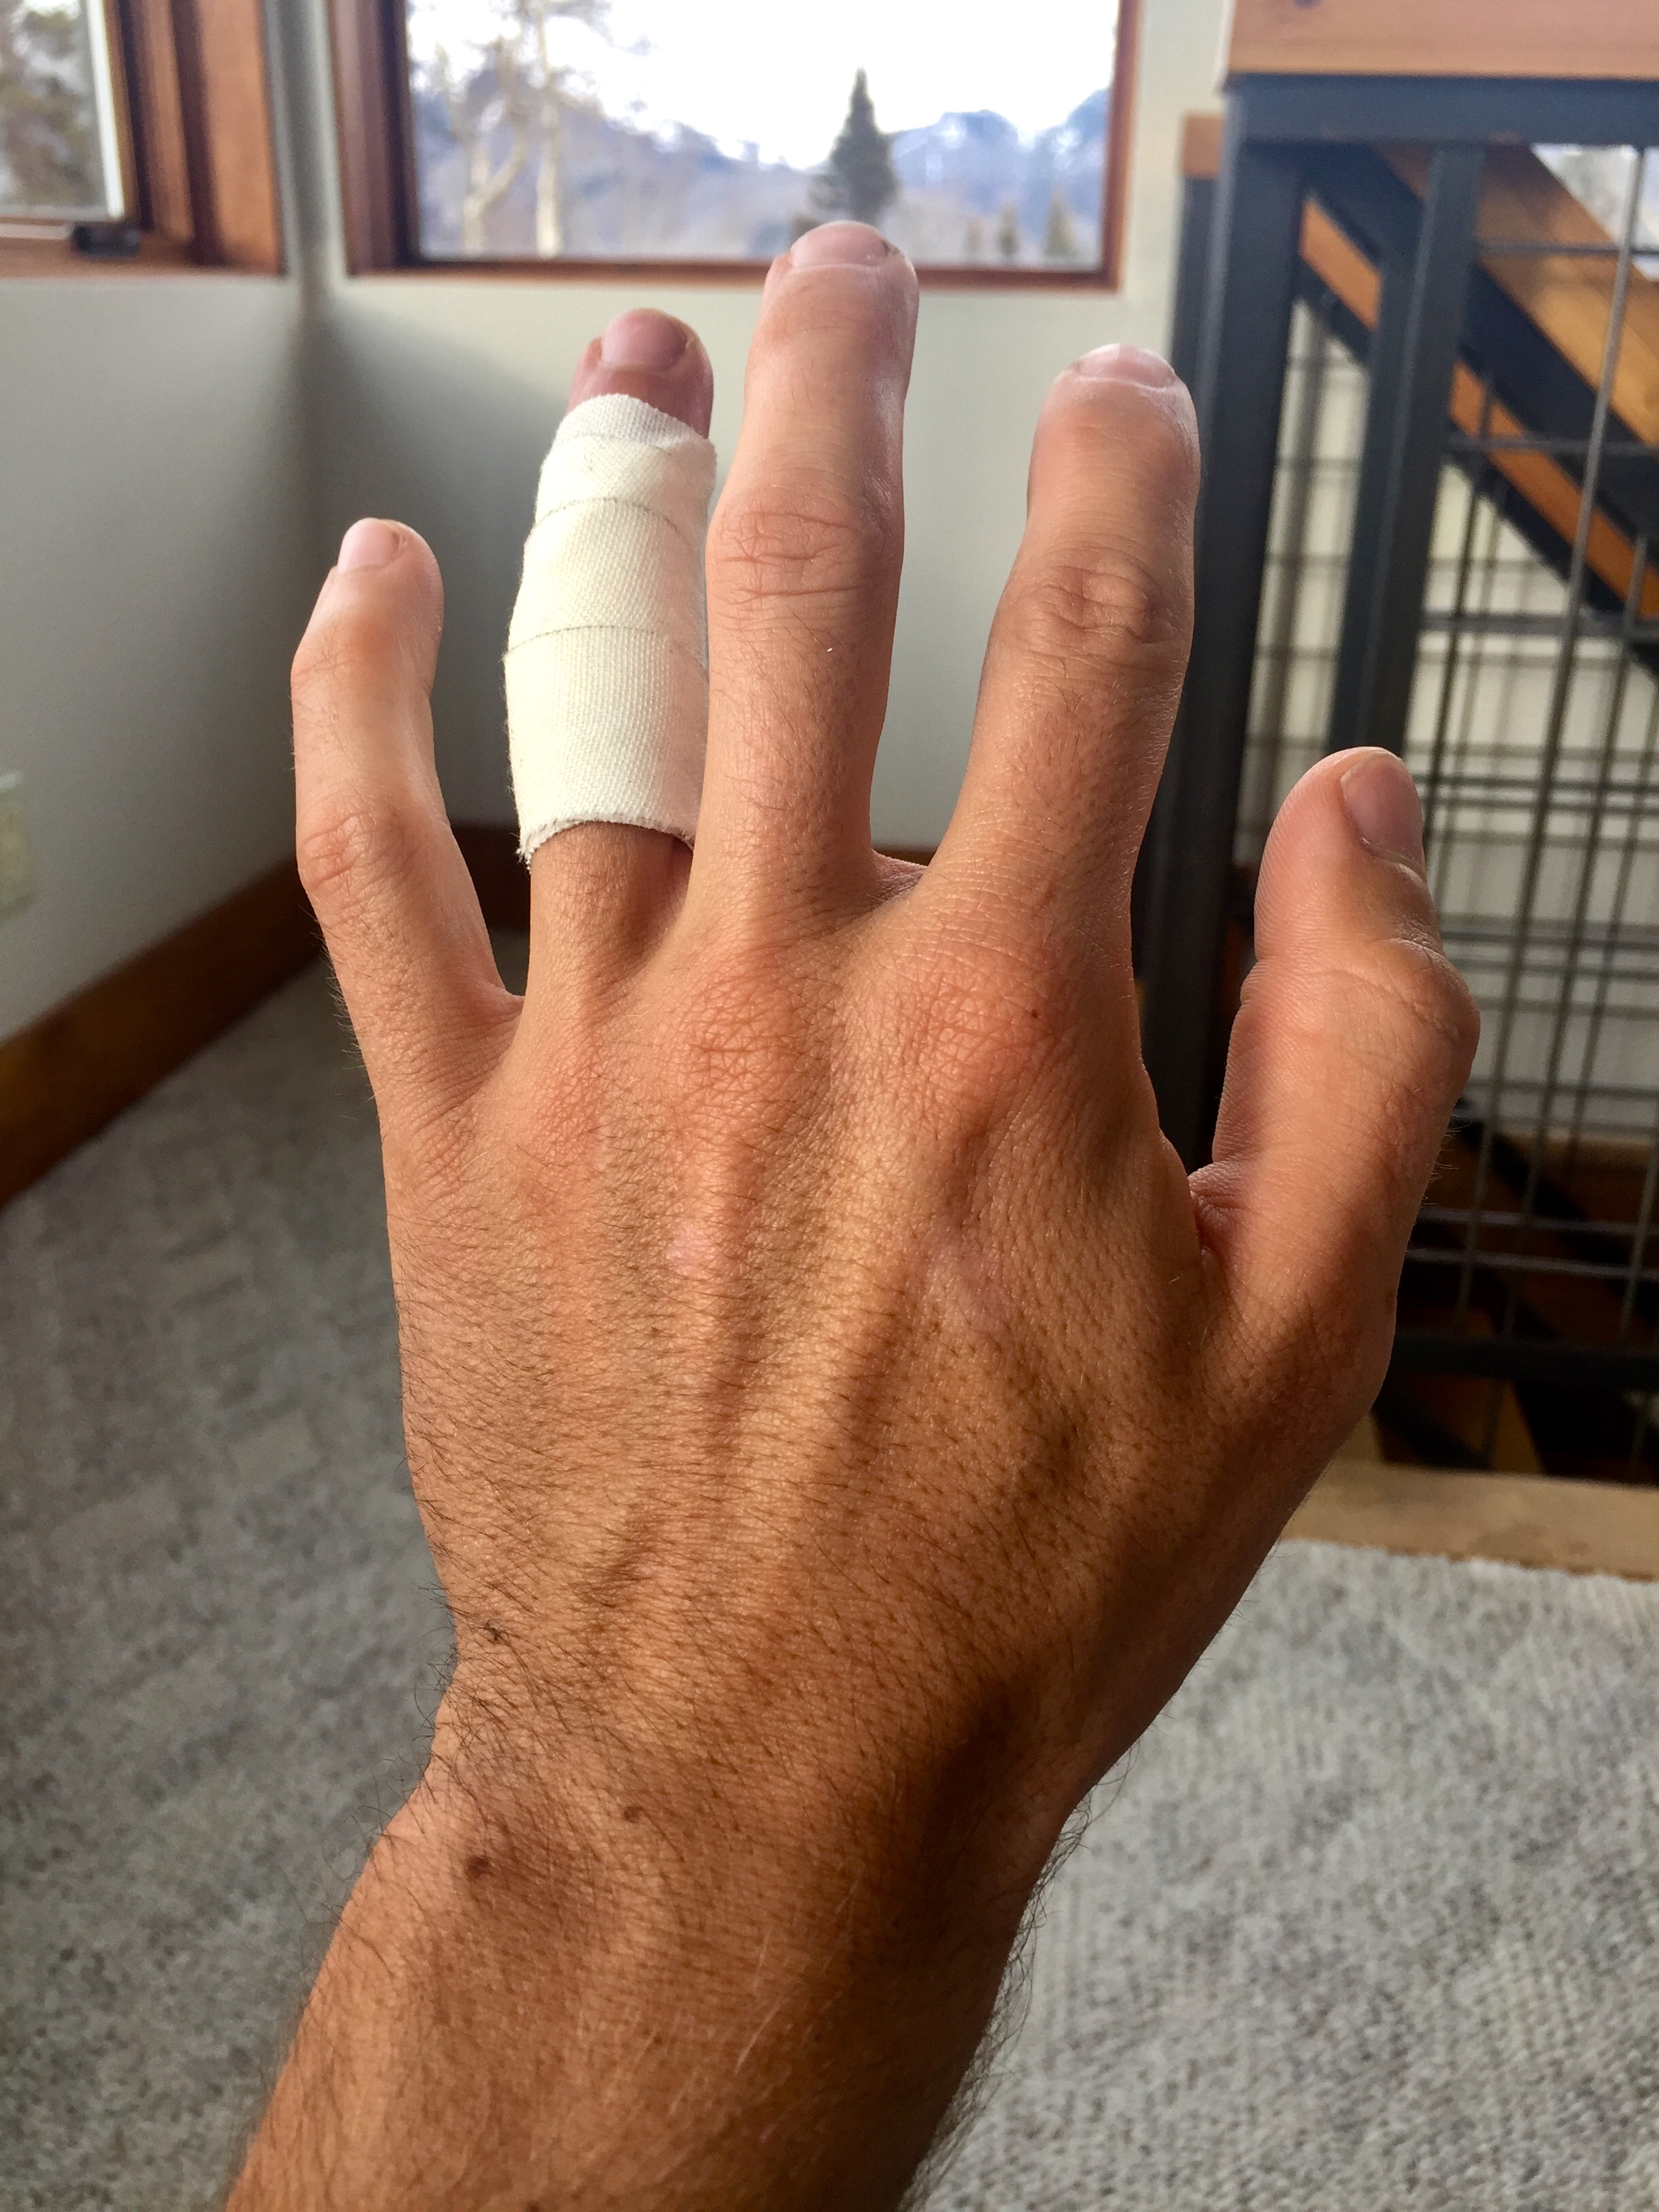
Step 1: Tear a piece of stiff tape (Leukotape is an option) roughly 10cm long. Cut/tear the tape in half longitudinally leaving a small “bridge” in the middle. Practice this step because leaving a bridge that is too small will have less of an effect.

Step 2: Attach the “bridge” portion of the H-tape directly to the PIP joint as seen in the image.

Step 3: Flex your PIP to approx. 60 degrees and apply the distal tape straps around your finger tightly. Don’t over-tighten, but you want them very snug. Dr. Schöffl says that the distal straps can be slightly tighter than proximal straps.

Step 4: Tighten the proximal straps making sure to keep the 60 degree flexion.

Step 5: With thin tape, retrace your work making a figure-8. This avoid the tape from unraveling while climbing.

The Experiment
Now that you know the background of the study, and what H-taping is and how it’s applied, let’s discuss the actual experiment. Subjects were placed on a standardized measuring device (see image below) in order to keep each subject’s arm in the same position for a standardized ultrasound reading. The measuring device also had a transducer at the end to make sure each subject was pulling with the same amount of force at the fingertip (10 N constant force in this study). Using this set-up, each taping method was tested (Schweizer’s circular taping, V. Schöffl and T. Hochholzer’s figure 8 tape, and I. Schöffl’s H-Tape.) A control trial where the subjects did not have any tape applied was also analyzed.

The results of the study demonstrate that H-taping produces statistically significant tendon-bone distances 16% smaller compared to without tape.15 The other two taping methods, circular and figure 8, did not influence the tendon-bone distance significantly (roughly 5% and 2% respectively.) Moreover, there was only a significant difference between H-taping and the other two methods, whereas the circular taping was not significantly different from the figure 8 method. In other words, H-taping was superior to the other two taping methods, and the other methods did not produce results to say that circular taping was better than figure 8 taping or vice versa.

Author’s Conclusions:
Even though all three taping types do offer a reduction in tendon-bone distance, H-taping was the only significant variation and should be used over other options.
The reduction in tendon-bone distance also implies that the tendon-bone angle has decreased at the edges of the remaining intact pulleys, and thus has decreased the friction between the tendon and pulley. This may help to prevent tendinopathies from developing when recovering from a pulley injury.
Taping can never approximate or improve upon the effectiveness of an intact pulley system. Dr. Schöffl says, “…we could not discern any positive effects either on the tendon-bone distance or on the finger strength for the healthy finger.”15 So taping to prevent a pulley rupture is highly unlikely, and not recommended.
The psychological effect cannot be ruled out. It is probable that athletes cannot produce optimal strength in the injured finger because they don’t “trust” it anymore. Tape might seem to enhance their strength in the injured finger because they feel better protected with the tape.
The author’s report that “it is possible that a part of the tape’s success [in finger strength] is due to a better transmission of the tendon tension to the external force developed at the fingertip due to a greater stretching of the muscle fibers.”15
Any tape will stretch, so the author’s recommend replacing the tape after each climb to ensure optimal support of the pulley system when climbing.
Note on tape type: Leukotape was used in the study and it is much stiffer than normal climber’s tape so we can assume that the tape most people use for their fingers will have slightly less of an effect as in the study. To achieve optimal results, consider buying Leukotape for rehabbing pulley injuries.

Advice From Other Sources:
In the book from Doctors Volker Schöffl and Thomas Hochholzer, the authors describe some additional benefits and aspects of H-taping to augment the information introduced above. H-taping works better than other methods because where the “H” bridge contacts the palmar side of the joint line, the soft tissue is relatively thin and this allows ample pressure directly to the pulley and the tendon. As mentioned above, it also allows direct pressure to over the A3 pulley, which is more stretchy than the other pulleys. Also, “because the palmar plate moves when the finger is flexed, taping in this position allows the tape to stay in a more stable position.”17
In addition to structurally supporting the injured pulley, H-taping also offers a potential preventative effect against developing a tendinopathy. When there is excess friction in the tendon sheath, akin to the scenario after a pulley injury due to the increased tendon-bone angle, a tendinopathy may occur. The friction is most pronounced where the tendon is deflected as it leaves the pulley. The tape helps to disperse the pressure on the pulley over a larger area instead of allowing the bowstringing to create a sharper angle over the pulley’s edge. This dispersion of pressure decreases the friction on the healing pulley, avoids tendinopathy and may speed up healing.
Regarding whether H-tape increases strength in climbers, here is what Schöffl and Hochholzer have to say: “H-taping increased finger power by a small percentage… This gain in power was only seen in hands where a pulley had been injured and not in healthy fingers.” 17 Again they caution the user not to prophylactically tape their fingers expecting protection against a pulley injury. They do however offer a tip: “Nevertheless we can recommend using H-taping prophylactically for routes requiring repetitive, high intensity crimping. In general, prophylactic taping is not recommended.”17 My interpretation of this tip: If you know you are going to be climbing a route with high intensity crimps, one after the other, the whole way up, you may choose to use H-tape as a preventative measure. But I do not see this as prevention for pulley rupture. We know what the research says about that. Instead, I would say this prophylactic measure is more to decrease friction on the system, and thus avoid overuse injuries at the finger like tendinopathies.


Dave Macleod, professional climber and author of the book, Make Or Break, has his own thoughts on pulley taping, so I’ll summarize here. He feels that the structural support offered by H-taping is not strong enough to truly protect the pulleys and also reiterates that tape stretches quickly and might not be enough.
Over the years, he has experimented with all taping methods when rehabbing his own pulley injuries, and says he has “never been able to detect any benefit.” For these reasons, he says he no longer uses tape when rehabbing a pulley injury, and notes his rate of recovery seems just as fast. These are valid concerns and due to his views, he suggests that during rehab when you begin easy climbing again, that you splint the finger at the PIP joint instead of H-tape. This is to avoid flexing the PIP. By splinting your PIP joint, this will ensure you are only climbing with an open-handed grip, and not stressing the pulley by crimping.
[Note: this is not to say that the other authors recommend using only H-tape early on in the rehab process. Go back and read Part 1 and Part 2 of my pulley injury articles to see the course of treatment.]
Macleod also makes the point not to let tape be something that makes you feel you can push harder than you should. Often times people feel more confident when using tape due to the psychological effects afforded, and they might climb too hard prematurely. In short, just be smart about your return to climbing, and don’t push it too much too soon.
Remember however that this is only one person’s advice and anecdotal evidence. Experiment for yourself with what works for you. Dave Macleod may have gotten lucky without using tape and never developed tendinopathies, but you may be more prone to such issues. Even by slightly offloading the pulley with tape, you might avoid other nagging issues during your rehab. See what works for you.

Recap and Conclusions:
Although research has been done regarding the efficacy of pulley taping, there is still a bit of uncertainty regarding whether taping does enough to protect the healing tissue. Remember from the research experiment testing H-tape’s effect on tendon-bone distance, that it only decreased the tendon-bone distance by 16%. That’s better than nothing, and statistically significant, but at the end of the day it’s not a whole lot. In my opinion, the best application for H-tape seems to be more practical as a way to avoid tendinopathies during the healing process. But it can still give your pulley some structural support during the rehab process. Again, the whole idea of taping the fingers is not to replace the pulley system, but to offer it some assistance while it heals.
With that said, you absolutely do not want your first return to climbing to be without any protection. I really like Dave Macleod’s idea for early rehab to splint tape your finger at the PIP joint to limit your finger to only using open-hand gripping. This avoids using a crimp grip altogether, and eliminates the risk of accidentally crimping and further injuring your pulley. In later stages of rehab when you begin climbing with higher intensity, using the taping technique with the best results experimentally is the best place to start, and that technique is H-taping.
There is another method for keeping your pulley safe during early rehab phases. In my previous pulley injury articles (Part 1 and Part 2), I discussed Dr. Schneeberger’s4 and Dr. Volker Schöffl’s pulley rings that they use to give truly rigid pulley protection during a patient’s rehab. Unlike tape that will stretch over time, these pulley rings are made out of plastic so you can expect them to offer legitimate pulley protection. As of now, these are probably the absolute best bet for offloading the tissue as your finger heals, but the issue is access to these tools. Not many doctors are currently fabricating these devices, so getting your hands on one might prove to be tricky. But that’s where the H-tape comes in to offer some pulley protection later on in rehab. Even with the pulley ring however, you must still adhere to the rehab protocol and avoid certain climbing grips and intensities until you are further along in the rehab process. The pulley ring does not make your finger invincible by any means. Keep your eyes out for pulley rings, and if your doctor is up-to-date, maybe she or he has one for you.
The bottom line is that if you injure your pulley, just get something on there to offload the healing tissue. By offloading the tissue you can help reduce stress to the healing pulley, and at the very least it will help you avoid tendinopathies from developing. From this point forward, you now know why H-tape is the method of choice thanks to the diligent research from Dr. Schöffl and her team, and all of the collaborators that helped shed light on the topic. Thanks for reading.
Sincerely,
Matt DeStefano, PT, DPT

Author Bio
Matt is a Doctor of Physical Therapy working in Telluride, CO who recently graduated from the University of Colorado’s Anschutz Medical Campus. While going to school, he lived in Boulder, CO to be closer to his playground. In his final semester of the DPT program he conducted an independent study researching climbing injuries and injury prevention techniques to provide to his clients. His main interests are in sports medicine physical therapy and injury prevention revolving around the climbing athlete. Before starting school, Matt lived in San Diego, CA and worked at Mesa Rim Climbing Center. He plans to one day return to San Diego and work alongside Mesa Rim to give back to the community he loves. Until then, he is very excited to have the opportunity of writing articles for and collaborating with Esther Smith at Grassroots Physical Therapy in Salt Lake City. Check out some podcasts featuring Esther Smith here.
Matt predominantly climbs sport at the 5.12c/d level, and has been exploring the world of trad in his distant back yard of Indian Creek. He has been climbing since 2008. Matt empowers people to take their health into their own hands, and guide them toward a stronger, injury-free climbing lifestyle. He currently teaches injury prevention classes at local climbing gyms, and also provides content about the topic on his Instagram (@theclimbingpt).
When Matt isn’t climbing, you can find him adventuring somewhere in the wild. He is also an avid biker. He rides BMX, downhill mountain bikes, and has completed a tour cycling trip around New Zealand. He connects with anyone in the extreme sports realm as a healthcare provider who has the capacity to understand their sport and assist them with their unique needs.
Follow Matt:
Instagram: @theclimbingpt // @basebklyn1
Contact Matt:
Email: mattdestefanopt@gmail.com